The SAGE web site is bundled with the deployment of the SAGE server. The web site is located at http://hostname:9080/sage. The SAGE web site allows users to view reports, manage terminology and guidelines, and administer the SAGE engine. Many server administration utilities are located in the Admin section, accessed by the Admin link in the upper right hand corner of the web site home page. The Home page is shown here.

Download a SAGE Tab
The home page of the SAGE website has a link which will allow the SAGE Tab to be downloaded to the user's computer. Click on this link and save the file named 'sage-tab.jar' in [Protégé Home]/plugins. Start Protégé, then open project and choose configure. Select the check box labeled SAGE. Protégé will now have a SAGE Tab. The SAGE Tab allows verification of an encoding, and testing with local or remote data.
Upload a modified guideline
Use Protégé to create a guideline. Follow the instructions above for downloading a SAGE Tab. In the SAGE Tab, choose Guideline, then Validate. If your guideline validates, Choose Guideline, then Generate. The generated guideline will be saved in the Protégé home directory. Browse to the SAGE web site and select upload guideline. You will be presented with a choice of known guidelines. Select one of these and upload the guideline. For more details about the Tab, see The SAGE Tab.
Add a new guideline
It is unusual to add guidelines. If you are updating a guideline, follow the instructions under Upload a modified guideline. To add a new guideline, select the Admin link in the upper right hand corner of the SAGE web site. Select system administration utilities then Add Guideline. Either enter the file name or browse to the guideline file. This will create a new guideline with the same name as the Protégé pprj file name. The CIS will need to be informed of this new guideline for enrollment purposes.
Map guideline codes
Mapping utilities are found on the web site under terminology utilities. From terminology utilities, choose manage translation. Standard codes in the guideline may be mapped to CIS specific codes. The mappings default to bi-directional. This means that the SAGE engine will translate your map from standard to CIS and back again. If the CIS already communicates using standard terminology, mapping is not necessary.
Here is the interface for creating a mapping.
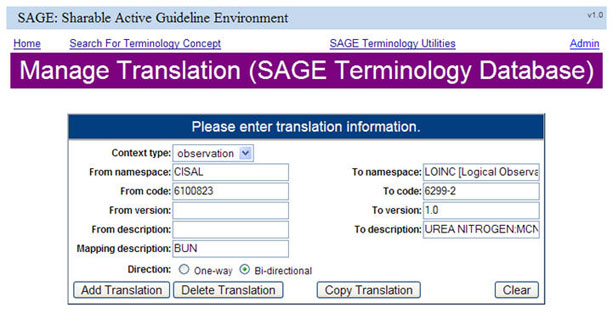
For queries, CIS codes are retrieved then mapped to common terminology. The resulting common terminology is checked for subsumption with a terminology service. In the case of actions, for example, orders, the common terminology is mapped to CIS specific values, which are sent to the CIS.
Send Events
The SAGE engine responds to events. Generally, events are sent from the CIS. In some cases, it is useful for a user to send events directly to SAGE. This is commonly done for testing and for batch processing. Events may be sent to SAGE by clicking on the Send Event link on the SAGE home page. The Send Event page asks for a patient ID. If the event is an administration event or batch run, the patient ID of 1 may be used.
Here we are about to send an "Inpatient hospital admission event" for patient id 01000298.

Set the operational mode
The SAGE engine boots up in Test Mode. The Set Operational Mode link on the SAGE home page allows the user to place SAGE in Test, Population or Remote mode. Test mode uses dummy data, similar to the local test mode in the SAGE Tab. Population mode sets SAGE to read data from the CIS, but SAGE will issues actions to change the CIS. Remote Mode causes SAGE to read data from the CIS and act upon the CIS. In this last case, we have a guideline operating in the normal mode of working with and on the CIS.
Reset the guideline state
The Guideline State for a patient may be reset under Admin then clear state. Clear state will clear SAGE of information about where the patient is in the guideline. Pending inquiries will be deleted, along with any goals and conclusions. This is commonly used for repeated testing of a specific part of a guideline. There is also a Clear State command under Admin, execute command. This will clear states for all patients.
Review execution logic and results
To examine what a guideline run did, and why, select Manage Log files from the SAGE home page. The run log may be displayed by selecting Display SAGE Server Log. Actions taken by the guideline will be displayed under Display SAGE Result Log. The Results Log will show the evaluations and outcomes of the guideline. This is the actual log file for the SAGE engine, therefore, additional information, warnings and errors will also appear here. To view the log as it executes, there is also a Tail Server log link which displays the terminal lines of the log on a continuous basis.

Answer questions from SAGE
Users may answer questions that SAGE may ask through inquiries during gudieline evaluation by selecting Admin, then Pending Patient Issue.